Saturday, May 26, 2012

Spaghetti Straps Refashion Dress

I love the idea of refashioning unused garments into useful items. I have not done many projects with this concept but I would certainly make it my priority in the future. Here's a successful refashioned outfit I had made for my daughter to wear on her Teacher's Day celebration last Friday. This is her final year in Kindergarten and I wanted her to have a great time before she starts primary school (elementary school) next year. Life will be a little bit more stressful for her and the programs at the primary school can be very demanding. Hence, I came up with the idea of making her a dress for the celebration.


Before and After
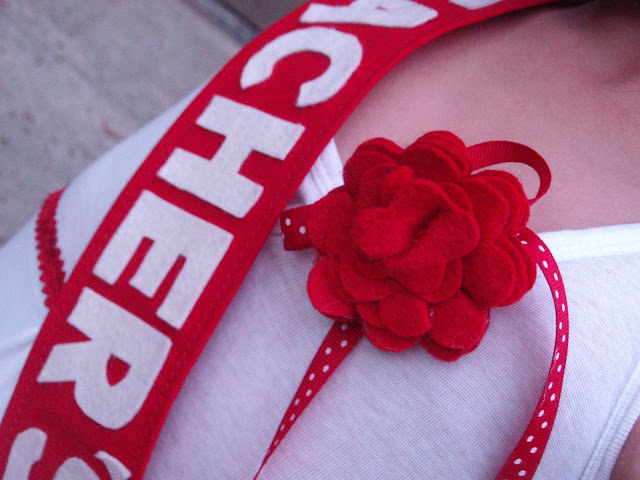
After some brainstorming, I decided to make her something using the felt materials that was scattered around my crafting room. I had been making felt flowers in the last 3 weeks. I found an overstretched spaghetti straps singlet that had turned too big for me and transformed it into a halter neck dress for my daughter. As usual I do not sketch, I like to let my creativity flow in spontaneously as I work. I cut long straps of scallops with felt and sew them onto the bottom of the dress.  I stacked roll after rolls of straps and stopped just before the bottom became too heavy. With some trims and gathers; 2 felt flower broaches and a "Teacher's Day" sash, my mission was accomplished in 2 days. I was so engrossed in my work that I decided to 'close' my kitchen for one evening. My two girls jumped for joy when they heard that they get to order Pizza delivery for dinner. Sound like I sew and craft better than I cook :)


With a tattoo on one arm and a gift for her teacher Eunice, Ning was all set to go to school and enjoy her day with friends and teachers. 

This was another red and white project I did with the colors inspiration from the book of French GeneralHome Sewn by Kaari Meng.
The sash was given to teacher Eunice for being a good teacher

Tuesday, May 22, 2012

Chalkboard " DAYS UNTIL" Countdown Sign


I made a short trip to Singapore last weekend to attend a friend's graduation ceremony and to meet up with friends and relatives. One of the meetings was with Jeanie, the sister-in- law of my sister. Jeanie and her boyfriend, Adam, had left the U.S. to work in Singapore since last December. I wanted to bring them a gift and I thought something for their apartment would be a good gift.


[ifc22[1].jpg]
Picture from Infarrantly Creative

I have seen a chalkboard project here for a "days until" sign that I planned to make one for my home as our family love the excitement of anticipating upcoming events and holidays. I thought this would also be a perfect gift for Adam and Jeanie. With this sign, they can look forward to holidays, events, and perhaps the day that they will go home to visit family and friends.


As I had mentioned on my last post "Mini Chalkboard Wooden Flower Pot Stand", the on going renovation of my new house provides me with materials for craft projects. I picked some wood planks and batons scraps from the site to work on some chalkboard projects.


Click here for tutorial page

First, I select a wood plank with the perfect length to make this sign. I measured the space allocated for both the wording and chalkboard. Then I headed straight to a sign maker near my area to order 2 sets of "days until" vinyl stickers. With the given measurement and selection of typo, the store sign maker was able to get it done for me within 15 minutes. . I didn't even need to give them a soft copy. I paid a mere RM2.50 (US$0.80) for each set of the stickers.

I wanted to start working on the project as soon as I got home from the sign maker but had to hold it back because that was a busy day. The next day, the day before my departure to Singapore, I was able to complete this project between my busy schedule o running errands and overseeing the landscaping work at the new house. I always believe that there are times to craft if you know how to prioritize your work. 

In the evening, I wrapped the sign with other gifts I prepared for friends and relatives.  I was looking forward to a short break from home and meeting up with people I care about in Singapore.


Wednesday, May 16, 2012

Mini Chalkboard Wooden Flower Pot Stand


My husband and I bought a new house about 20 months ago and it has since been going through some rigorous renovation works.  I took the opportunity to use some of the remnants from my new house renovation to create all kinds of craft projects. The workers are current laying down the parquet flooring and there are plenty of wood to play with!


A coat or two of chalkboard paint, the pot stands are ready for you to scribble on it!


While the workers were busy laying down the timber flooring, I took the some batons scraps to make these mini chalkboard flower pot stands. The best part is that I get help from these workers to saw the batons with their electric saw.  Ha, that saves my trouble to saw the wood by hand! With the available wood adhesive on the site, I glued the batons into flower pot stands and sprayed paint it with my new toy - chalkboard paint.

Chalkboard paint is not easily available in Malaysia though they are factories manufactured this paint for export. I am very lucky to have a bottle to play with. While I have not try it myself, I have learned that it is pretty simple to make chalkboard paint. Grout is a key ingredient and I saved some from the balance of the recent tiling work at the new house. I am looking forward to trying it out soon. Click here for a tutorial for making chalkboard paint.

My daughter Ning wanted one pot stand. She objected me doodled on hers.


I need to get few more cactus to fill the empty pot stand.


The newly bought cactus plants sit prettily in these mini wooden flower pot stands. Lovely! I will find a nice spot for them when I move into the new house.

Tuesday, May 1, 2012

What can you do with your old worn handbags and fabric scraps


My experiences traveling to the Northern Vietnam many years ago had taught me to not be wasteful and conserve even the most easily available resources in my daily life.   On one of my visits to Shawn’s home, a Hmong young girl, for sewing lessons for a few Hong girls in her village, I witnessed how the family treasured every little piece of materials.  It does not matter that it is new or old cloths; every tiny piece of materials were salvaged for sewing projects that are an essential part of the family income.  Resources are scarce in the mountainous region in Vietnam and people who live here learned to conserve every single resource that is available to them.   The other part of the world known these efforts as reduce, reuse and recycle; but it is a way of life for the Hmong just because it is necessary.


Recycle materials/accessories from your worn out handbags
I don’t’ usually buy products that are made with PU synthetic leather because they do not last very long.  But I somehow still have two handbags made with this material. As I expected, the outer layer of the handbags began to flakes off within two years of light use.  It is very frustrating and wasteful to trash these bags when other parts of the handbags are still in good condition.  The accessories on the bags are something that I can recycle and I especially like to keep the zippers which are not available for sales in regular stores.   So, I dismantled the zippers, hooks, rings and canvas slings from the handbags.  I can easily recycle these items in my crafting and sewing projects.
A friend of mine decided to give me her old handbags that she was ready to throw away when she heard about my good stories to recycle the parts.  Being frugal and resourceful, I examined her stuff and found two of the handbags are still in decent condition.  My weekly cleaner was happy to adopt them.  As for the rest of the bags that my friend gave me – I stripped all the parts off over a TV show.  These materials will reappeared in better forms in my new projects in the future.


Saving fabric scraps for new projects
I have the habit of keeping fabrics scraps but, in the past, I would usually throw away pieces that are smaller than the size of my palm.  Upon my return from Northern Vietnam, I started to keep even the tiniest fabric scraps from all my sewing projects.  Being a little OCD (!), I would organize the fabric scraps by the sizes and kept them in different containers for easy access.   These scraps come very handy for various sewing projects, for mending torn clothes, making collage artwork with kids, and more.  As for those tiny winy pieces, I use it to fill my hand made toys.
Obviously I don’t throw away old, torn or stained clothes.  I keep them in a box and use them for all kinds of projects,  I use fabric from my old Indian cotton blouse to me the faces of my “Bu Wa Wa” (Click here to see the article). 
So the next time you are thinking about throwing away any of your handbags, old clothes, fabric scraps or anything else, try to take another look of the materials and think of what you can do with it. 


First Giveaway Winner


The first giveaway was unsuccessful with only one follower responded. Hence Jun Yin you are the winner without competition! Please give me the initial you like to have for the 2 cutlery bags.


The feedback I had was the giveaway is not interesting. Thank you all for reading my blog and given the feedback. It helps for a new blogger to advance further.