Friday, December 21, 2012

Handmade Notebook with French General Giveaway

Lucky me had won 'The Warp and the Weft'  of French General blog Petite Odile giveaway in end April 2012. The giveaway consisted of a Jelly roll fabric, cards and stickers from French General. Thanks to French General for posting the parcel across half the globe to Malaysia. And I had promised to make something out of the Petite Odile jelly roll. Finally after a few months, a handmade book was made with the given fabrics.


The patchwork idea came into my mind as individual piece of the long narrow stripes could not cover the surface of the book. Making patchwork was great as it display different prints and shades of the Petite Odile collection.


I made use of everything in the gift package including the wrapper and whatever I could get in my stock for an old french theme. And I hope for more acquires in future to add on to this book.

This handmade kettle stitch book collects sewing notions like vintage buttons,laces, fabrics, inspiring motifs and images with red, white, cream and natural are the key colors. It was an inspiration after the French General.


Monday, December 3, 2012

Duo-sided Christmas Napkins


I haven't got over my red mania since last Christmas. The French General had quite an impact on me since I learn about it from Kaari Meng books. Thanks to a dear friend recent order for Christmas theme napkins as one of the item in her gifts catalog, I got to continue my red mania project. I happily designed and handpicked some fabric for the napkins and sent them to a workshop for the order. I sew some extra for personal use and gifts to dear friends as I think that is more special. Another reason is because I could do better job than the workshop as I take longer to sew.


Diagonal Buffet Server  with pocket for holding cutlery set
I have designed duo-sided table runner and table mats last Christmas. Now, it is a table napkin. The purpose for designing the duo-sided napkin is simply to have extra option for table display.  After sewing the sample, I searched on Youtube for napkin folding tutorial. I found this napkin folding- Diagonal Buffet Server great to display the duo face napkin I made as it shown the different colors of the two sides. 


To personalize the seat, just add a name tag of your guest on the white fold


I have never use fabric table napkin at home as this is not common practice in Asian homes. This is the first time I learn to fold a fancy design napkins and that was really fun. I hope to learn more ways of napkin folding when I have time.


Lily Napkin reveals the different side on the top fold
Simple Butler Napkin with a fold on the top flap to reveal the different side
Vintage brass napkin ring I bought in Healdsburg Antique Fair 2011
adds charm to table setting. But one problem, I only have one ring.


I couldn't wait to use these beautiful napkins for my Christmas events at home in this December. Click here for this easy to make napkin tutorial.

Thursday, November 15, 2012

Makeover of Family Area


The vibrant mix of colors and ethnic flare in this room caught my attention when I was pinteresting one day. I repined the photo to my home decor board right away. I would love to create a similar area in my house.

Picture from
http://blog.hgtv.com/design/2010/10/01/blog-of-the-week-sf-girl-by-bay/


We moved to our new home one and two months ago on 17th September 2012. While there are still projects for home improvement, I have finally unpacked all our stuffs and stored them accordingly.  I am taking time to add the finishing touches around the house. There are days that I would transfer plants from the old house, located not too far from the new one. Other days I would hang up pictures on the wall. After looking at the above photo again last night, I decided to do a little makeover for our family room, something that I have been reluctant to do because my husband prefers the decor and colors in the house to be simple and plain. But I finally decided to rule over him and take over the space since this area is adjunction to my studio. I supposed I can do what I like for my space :)

Before


Before the makeover, the corner had a slight ethnic flavor with the display of the Uyghur's carpet on the floor and Chinese floral cushion cover and Borneo Ikat displayed on top of the improvised TV bench. I found the room pleasant but it has yet to achieve my expectation. I love ethnic-eclectic style for home décor.  It will allow me to display my collection of beautiful textiles and knick knacks that I picked up from my travelling.  Additionally, I have made many cushion covers that will fit perfectly to this concept.

After
1- Cat stuffed toy from Northern Thailand; 2- Embroidery work from Uzbekistan; 3- Baby carrier of Dong people, China; 4- My handmade cushions and covers; 5- Left - white base cushion cover from the Akha people of Northern Thailand; 6- Yu Yu chair of Indonesia turned into TV shelf.


With a little creativity, I turned this little corner of my house to an oasis for cultural experience. Nice! This is a perfect place for reading and watching TV shows. I love the result but I believe there is still room for improvement. Perhaps I can change the curtain on the door or hang few more things on the wall to enhance the concept. I will keep you updated when there are new improvements to this project. 

Note: Please excuse the poor quality shots because I am relying on a phone camera for photography at this point of time.

Friday, November 9, 2012

Gathered Fabric Flower with Bird Hair Clip


My little girl had been talking about her kindergarten party all week. She kept asking me which outfit to wear and what headgear to match her outfit for the party. The kindergarten she is attending organized a headgear party today before the end of the school year next week. This is my daughter’s last year in the kindergarten and she will advance to primary school starting Jan 2013. I want her to enjoy her party and have been planning on making her a headgear or a hat to wear on that day. However, many events took place since end of last week, and I was not able to work on the headgear until this morning.


After sending my eldest daughter off to school at 6.15am, I started making this gathered fabric flower hair clip with bird resting atop. My initial plan was just to make a big flower hair clip. After completion of a flower hair clip, I felt like adding something to make it more interesting. A little decorative bird in the hallway flashed into mind. To enhance the concept, I picked up a green leave from my basket of artificial flower and add it at the bottom of the flower. Here it goes of my little creation completed in 2 hours. I would have added a tiny twig if my little girl would use it.


My little girl was not pleased with the bird resting atop the flower as she didn't want to look too outstanding among her friends. I had to convince her that other kids will come in fancier outfits and her headgear will just be cute and creative. The persuasion continued for a while and it eventually ended with bribery of a technical pencil, a stapler and an eraser!


At last, she was convinced and happy, and so was I. She returned home happily after school and told me about all the compliments she received from her teachers and friends.

The tutorial page should be out in few days. You may find it on Yann's Simple Tutorial page.

Friday, September 7, 2012

Felt Flowers Mania

Though I have not been posting regularly lately, my hands have never stopped crafting.  I have been constantly designing and planning something for my new house which we planned to move in 2 weeks. My creative desire has been fulfilled of late - some day is more than the other.


My garden of joy
Layered scallop felt flower wrist tie


Layered scallop felt flowers hair bands


Felt flowers broaches and clips
These felt flowers are gorgeous. I had seen them on shoes, bags and hair accessories. I have been thinking about making it awhile but had never really started until I came across free online tutorials 4 months ago day. Since then, I have been making these felt flowers in between my busy schedules. I made these flowers while waiting for my girls’ at their music lessons, English programs and whenever I have to wait. I do have to finish the gluing processes with the glue gun at home.


Pretty scallop felt flowers head bands
Which clip do you like most?
This would look great on little red riding hood


Elastic hair bands
Perfect pair for bunches and pigtails of little girls


I finally started selling them 2 months ago with the hope of collecting fund to buy new crafting gadgets. The moms & teacher in my girls' music classes, and my friends have been very supportive to my “fundraising” project. I am participating in a church fundraising event for the needy community this September (2012). These felt accessories will be on sale at the event and all proceeds will go to charity.


Lovely rose clips, hair bands

My 10 year old daughter was inspired to make them after watching mummy making these felt flowers accessories. She made some felt flower elastic bands for her cousins. If a 10 year old can made it I bet you can do it too. I have two tutorials on how to make the felt flower Check out the gradual tone felt rose and felt rose ring from my tutorial blog and also Jess's blog on the scallop layered flower & rolled felt flower.

Saturday, June 9, 2012

Mini Eraser Charm Bracelet


Turn mini erasers
into

Charm Bracelet


One morning during my younger daughter, Ning, two weeks school holiday, I brought her to a bookshop to buy books for her. She spotted a cute set of eraser in the bookshop and asked if she could have it. I bought her and her sister a book each and a really cute set of Korean made mini erasers.

The stationery these days are so pretty. Kids are drawn to their designs more than their functions. The set of eraser Ning picked looked more like candy and toy, so small in size that one may find difficulty to use it. She offered some of her mini erasers to her sister and cousins. Later, when she got tired playing with them, she asked me what could she does with them. I suggested making a charm bracelet with the erasers. Her eyes sparkled to excitement as she loves charm bracelet. 

We had a good time making the charm bracelet together. It was a quick project to make with the available materials and tools at home. Click here for Yann's tutorial page on making it.


Saturday, May 26, 2012

Spaghetti Straps Refashion Dress

I love the idea of refashioning unused garments into useful items. I have not done many projects with this concept but I would certainly make it my priority in the future. Here's a successful refashioned outfit I had made for my daughter to wear on her Teacher's Day celebration last Friday. This is her final year in Kindergarten and I wanted her to have a great time before she starts primary school (elementary school) next year. Life will be a little bit more stressful for her and the programs at the primary school can be very demanding. Hence, I came up with the idea of making her a dress for the celebration.


Before and After
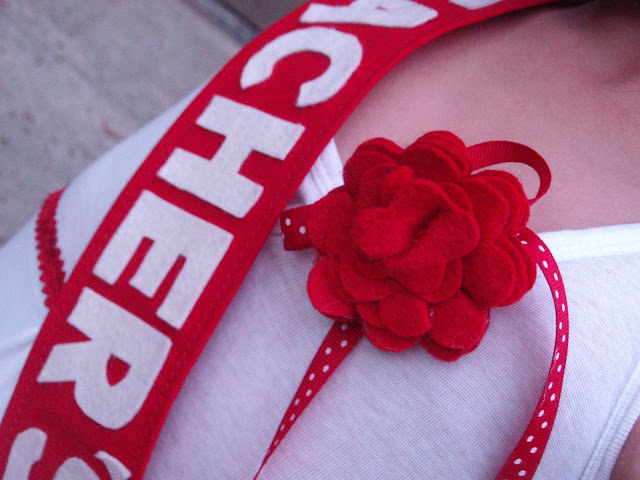
After some brainstorming, I decided to make her something using the felt materials that was scattered around my crafting room. I had been making felt flowers in the last 3 weeks. I found an overstretched spaghetti straps singlet that had turned too big for me and transformed it into a halter neck dress for my daughter. As usual I do not sketch, I like to let my creativity flow in spontaneously as I work. I cut long straps of scallops with felt and sew them onto the bottom of the dress.  I stacked roll after rolls of straps and stopped just before the bottom became too heavy. With some trims and gathers; 2 felt flower broaches and a "Teacher's Day" sash, my mission was accomplished in 2 days. I was so engrossed in my work that I decided to 'close' my kitchen for one evening. My two girls jumped for joy when they heard that they get to order Pizza delivery for dinner. Sound like I sew and craft better than I cook :)


With a tattoo on one arm and a gift for her teacher Eunice, Ning was all set to go to school and enjoy her day with friends and teachers. 

This was another red and white project I did with the colors inspiration from the book of French GeneralHome Sewn by Kaari Meng.
The sash was given to teacher Eunice for being a good teacher

Tuesday, May 22, 2012

Chalkboard " DAYS UNTIL" Countdown Sign


I made a short trip to Singapore last weekend to attend a friend's graduation ceremony and to meet up with friends and relatives. One of the meetings was with Jeanie, the sister-in- law of my sister. Jeanie and her boyfriend, Adam, had left the U.S. to work in Singapore since last December. I wanted to bring them a gift and I thought something for their apartment would be a good gift.


[ifc22[1].jpg]
Picture from Infarrantly Creative

I have seen a chalkboard project here for a "days until" sign that I planned to make one for my home as our family love the excitement of anticipating upcoming events and holidays. I thought this would also be a perfect gift for Adam and Jeanie. With this sign, they can look forward to holidays, events, and perhaps the day that they will go home to visit family and friends.


As I had mentioned on my last post "Mini Chalkboard Wooden Flower Pot Stand", the on going renovation of my new house provides me with materials for craft projects. I picked some wood planks and batons scraps from the site to work on some chalkboard projects.


Click here for tutorial page

First, I select a wood plank with the perfect length to make this sign. I measured the space allocated for both the wording and chalkboard. Then I headed straight to a sign maker near my area to order 2 sets of "days until" vinyl stickers. With the given measurement and selection of typo, the store sign maker was able to get it done for me within 15 minutes. . I didn't even need to give them a soft copy. I paid a mere RM2.50 (US$0.80) for each set of the stickers.

I wanted to start working on the project as soon as I got home from the sign maker but had to hold it back because that was a busy day. The next day, the day before my departure to Singapore, I was able to complete this project between my busy schedule o running errands and overseeing the landscaping work at the new house. I always believe that there are times to craft if you know how to prioritize your work. 

In the evening, I wrapped the sign with other gifts I prepared for friends and relatives.  I was looking forward to a short break from home and meeting up with people I care about in Singapore.


Wednesday, May 16, 2012

Mini Chalkboard Wooden Flower Pot Stand


My husband and I bought a new house about 20 months ago and it has since been going through some rigorous renovation works.  I took the opportunity to use some of the remnants from my new house renovation to create all kinds of craft projects. The workers are current laying down the parquet flooring and there are plenty of wood to play with!


A coat or two of chalkboard paint, the pot stands are ready for you to scribble on it!


While the workers were busy laying down the timber flooring, I took the some batons scraps to make these mini chalkboard flower pot stands. The best part is that I get help from these workers to saw the batons with their electric saw.  Ha, that saves my trouble to saw the wood by hand! With the available wood adhesive on the site, I glued the batons into flower pot stands and sprayed paint it with my new toy - chalkboard paint.

Chalkboard paint is not easily available in Malaysia though they are factories manufactured this paint for export. I am very lucky to have a bottle to play with. While I have not try it myself, I have learned that it is pretty simple to make chalkboard paint. Grout is a key ingredient and I saved some from the balance of the recent tiling work at the new house. I am looking forward to trying it out soon. Click here for a tutorial for making chalkboard paint.

My daughter Ning wanted one pot stand. She objected me doodled on hers.


I need to get few more cactus to fill the empty pot stand.


The newly bought cactus plants sit prettily in these mini wooden flower pot stands. Lovely! I will find a nice spot for them when I move into the new house.